Thursday, September 15, 2016

❥•.¸¸.•*´ Artist: ©Natalia Poser Tube: NZ Aletta `*•.¸¸.•❥

❥•.¸¸.•*´ Ct Tiny Turtle Designs`*•.¸¸.•❥

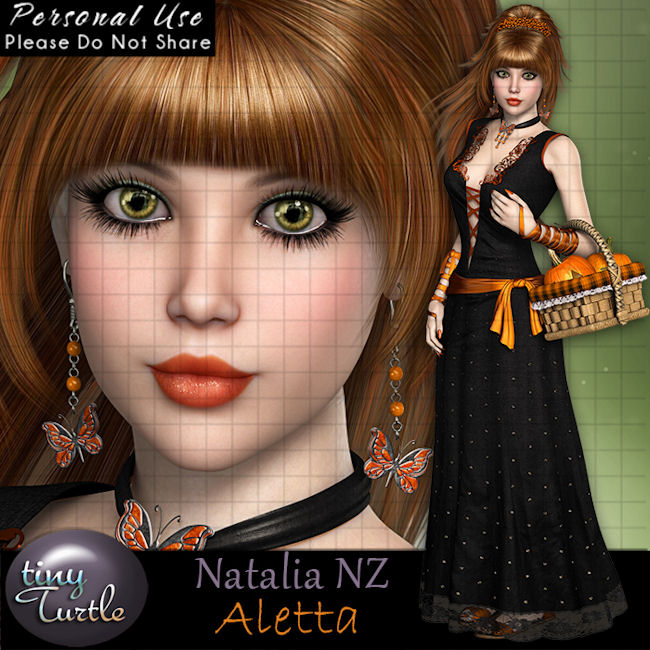
Artist: ©Natalia Poser Tube: NZ Aletta
Perfect poser for all your Fall and Halloween themed tags. I paired this poser with a scrap kit designed by Dance in the Rain: Fright Night and a scrap kit designed by Tiny Turtle Designs: Rachel. Both kits as well as this gorgeous poser are available at Tiny Turtle Designs.

Poser is available here
Scrap Kit Rachel Available here
Scrap Kit Fright Night available here


Sunday, September 11, 2016

~~ Welcome to my Lair ~~

❥•.¸¸.•*´ Ct for Diamond Designs`*•.¸¸.•❥


  This is an awesome kit for your Halloween and goth tags. There is a lot of fun here for your Halloween tags. Will work well with goth tags as well. Kit comes with 2 chibis and some ready made clusters. You can't go wrong with this kit designed by Diamond Designs.
Kit cointains 95 Elements and 7 papers
I paired this kit with an awesome tube by © Very Many and ©Kajenna available at Pics For Designs. You must have a license and have purchased these tubes in order to use them.


Diamonds Designs sells at these stores:
Daelmans Designs
Digi Divas
Designer Scraps


Wednesday, September 7, 2016

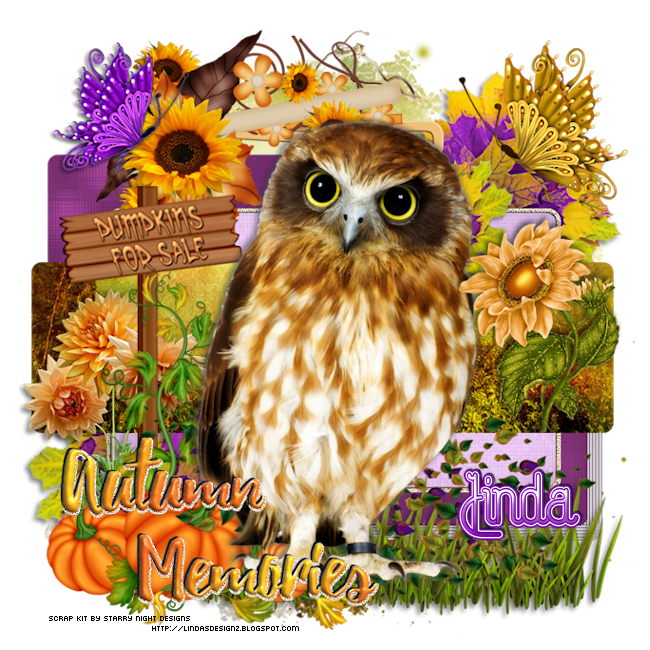
PTU Tutorial: My Autumn Breeze

CT Tutorial for Digi Divas: Autumn Breeze

Scrap designed by Starry night Designs: My Autumn Breeze. This is an absolutely awesome kit for autumn - all of the normal autumnal colors with purple thrown in . Contains 122 Elements/14 Papers PTU/PU Only

Scrap Kit is available here at Digi Divas

Starry Night Designs is one of the Spotlight Designers at Digi Divas this month and her kits are currently 50% off. So drop on by and check out all of her great kits, as well as everything else Digi Divas has to offer.

Legend


C/P = Copy Paste / D/S = Drop Shadow default settings: 3 -3 58 7.92
bg: background, / S/F/D: Select All, Float, Defloat / E or el: Element
R: Resize / Unsharp mask Settings: 3 30 3 (Use after resizing if the image looks grainy or blurry )


I try to write my tutorials as plain and clear as possible, but if I get you confused (and, if I do, I am sorry) you can always refer back to the image we are making for reference. Also, this is just a guideline (I write where I place the elements ) but, feel free to move them around, or add different elements. Have fun and experiment, it is the best way to learn new things.

This tutorial was written by me on 09/07/2016 and is purely of my own making.
If there is any resemblance to any other tut it is purely coincidental. Please do not claim as your own.

Please refer to my TOU on the left sidebar.

Needed Supplies / Filters


Template by Rachel's Designs Available Here
Mask by Rachel's Design: RR-MaskSet36-Mask1 Available Here
Xero Filter (porcelain, clarity and fritillary) Available Here
Filter: Funhouse ~ Streak Mirror Available Here
Scrap Kit My Autumn Breeze by Starry Night Designs Available Here at Digi Divas
Tube of choice - I used Mr Fennec by ©Laguna. Available at PFD (Pics for Design)
Fonts used: Cimochi and Capella


           Okay, ready to start? Let's begin.
  • Open template Shift + D Close original. Delete tag info (raster 1)
  • Delete white background layer
  • Resize canvas All Layers checked 800 X 800
  • merge layers 3 and 4 Select all Float defloat C/P pp10 as new layer
  • On paper layer invert , delete. Deselect.
  • Apply funhouse filter streak mirror default setting (27, 27)
  • Close off yellow rectangles (you can delete if you want, but I always close them so it is easier to go back and change something if I want or need to)
  • Layer 6 (Lg green rectangle) Select All, Float, Defloat C/P pp5 as new layer. On paper layer - invert - delete. Deselect
  • Apply Filter Xero - Frittilary default settings then Xero - Porcelain default settings except move blue slider to 0
  • Apply D/S with these settings: 1, -1, 100, 0.99 reapply D/S changing to -1, 1
  • Layer 5 Manual Color Correction source - FFFFFF target - #f8d6ae. Effects - Edge Effects - Enhance
  • On layer 6 (light purple ) merge down
  • Layer 9 (orange rectangle) S/F/D C/P pp 12 as new layer move paper up so that the bottom of image shows On paper layer invert delete deselect
  • C/P E 113 Free Rotate right 90 all layers unchecked move to left above light purple paper layer
  • C/P E 49 R 52% Place above leaf layer at raster 1. Sharpen - Unsharp mask>
  • Apply Xero - Porcelain filter. Close or delete Raster 1
  • Duplicate X 2 on first duplicated layer Free rotate left 68 all layers unchecked - place over raster 7 (yellow leaf) close or delete raster 7
  • On 2nd duplicated layer Free rotate with same settings but change left to right. Duplicate Place above raster 8 layer delete or close raster 8
  • On Duplicated image free rotate again same settings Place above raster 2 layer - delete/close raster 2
  • If you have not already done so apply unsharp mask to above 4 layers
  • C/P E 7 Drag below 1st leaf layer
  • Working on top canvas layer below but below the word art
  • C/P E 4 move above grass layer
  • C/P E 111 R 62% place to left
  • C/P e 59 place to left
  • C/P E 81 R 68% X 2 place center right
  • C/P E 93 place on center of canvas - Duplicate
  • C/P tube as new layer (I used Mr. Fennec artist ©Laguna available at PFD) - You must own and have proper license to use this tube. R: 52% then 80%)
  • (If you want to you can use E 93 (the owl) at full size in place of a tube)
  • On top tube layer apply guassian blur 4 - Filter Xero - porcelain same settings.
  • Apply xero - clarity default settings
  • Change Blend mode to soft light - merge down
  • C/P E 41 R 62% X 2 then 80% move to upper left
  • C/P E 40 R 62% X 2 Mirror place to upper right
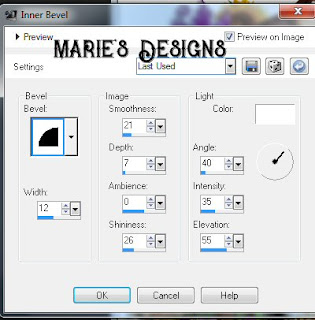
  • On top word art layer apply effects - 3d -inner bevel with these settings: Bevel 2, W -12, Smoothness: 21, Depth: 7, Ambience: 0 Shiniess: 26, Color: White, Angle: 40, Intensity: 35, Elevation: 55

  • On bottom part of word art Adjust - Manual Color Correction: Source: white Target: #f8d6ae. Add noise Guassian checked, Monochrome checked, Noise: 50. Then effects - edge effects: enhance
  • Back on top layer of word art apply D/S -2, -3, 90, 0.99 Merge Down
  • Place word art to bottom left over pumpkins
  • Merge visible R 95%
  • New layer drag to bottom of canvas Select All C/P pp 12 into selection
  • Load Mask I used RR-MaskSet36-Mask1 Merge group
  • Resize canvas to your preference
  • Add copyright and license info
  • Add name and save as PNG (save as psp first if you want to add other names later) then export png optimizer
Done !! Yeah. I hope you have enjoyed this tutorial and I thank you for trying it.

Sunday, September 4, 2016

Ct Moonshine Dezinez: Kilana

PTU Tutorial for Moonshine Dezinez - Kilana

,tr>

Stunning kit by Moonshine Dezinez: Kilana
Available exclusively at Hania's Designs.
Scrap Kit Available Here

This kit was made to match a tube by ©Celine Art Pinup by the same name.
Tube is not included but can be purchased at Hania's Designs.

Scrap Kit is Available Here

This great tube by ©Celineart Pinup (Kilana) has 3 layers - including a Zombie layer.
Tube Available Here

Legend


C/P = Copy Paste / D/S = Drop Shadow default settings: 3 -3 58 7.92
bg: background, / S/F/D: Select All, Float, Defloat / E or el: Element
R: Resize / Unsharp mask Settings: 3 30 3 (Use after resizing if the image looks grainy or blurry )


I try to write my tutorials as plain and clear as possible, but if I get you confused (and, if I do, I am sorry) you can always refer back to the image we are making for reference. Also, this is just a guideline (I write where I place the elements ) but, feel free to move them around, or add different elements. Have fun and experiment, it is the best way to learn new things.

This tutorial was written by me on 09/04/2016 and is purely of my own making.
If there is any resemblance to any other tut it is purely coincidental. Please do not claim as your own.

Please refer to my TOU on the left sidebar.
Filters Needed:
Zero - Porcelain and clarity
Penta.com Dot and Cross
Filters Available Here
Font: Bubble and Soap - Font Here
Mask: MD-set5-3 or one of your choice Mask Here

Okay let's get started. Remember to save often and most of all have fun.
My tutorial only serves as a guideline so if you want to change something please feel free to do so.

  • Open Frame02 Duplicate (Shift + D). Close original
  • Image - Canvas Size 800 X 800 change picture position to upper center
  • New raster layer Drag under frame layer with magic wand click inside frame - expand 5
  • C/P Pp 08 into selection deselect
  • Back on top layer C/P Frame 03
  • C/P E9 R 80% X 3 Place on framed image between the palm trees
  • C/P EL 08 move below bottom frame layer anchor 1 With eraser tool remove some of the water on the outside of the frame
  • Duplicate EL 08 - move to top layer with eraser tube erase some water over the bamboo frame on the right side exposing one stalk of the bamboo
  • C/P 06 move above first wave layer
  • C/P E13 move to right duplicate mirror On first sand image R 90 % on duplicated sand image R 75%
  • C/P Tube Anchor 2 - if using the same one I am - R 68% then 90% move to center left bring duplicated sand image above tube layer
  • Duplicate tube - Apply guassian blur setting 4
  • Apply Xero - porcelain filter default setting. Change blend mose to soft light. Or one that you like. For instance Screen will give it a brighter lighter color ,Multiply a darker hue so play around and see what you like best
  • Merge Down
  • On bottom water layer - duplicate remove anchor 1 from image. Move up to layer below the mirrored sand image. The water will overlap the bottom of the screen - with eraser tool remove some of the darker blue part
  • Apply Xero - Clarity. Default settings
  • Back on top sand layer with your deformation tool turn the sand to the right some so that it aligns with the wave.
  • C/P E 02 R 58% X 2 then 82%
  • C/p e 21 R 58% place upper rt of frame
  • C/P E 05 R 58% X 2 Place top rt of frame
  • C/P E 15 R 58% X 2 Place above frame layer position top left . Duplicate twice free rotate one frond 50 Right All Layers unchecked, the other frond Free rotate 110.50 Right Use unsharp mask Apply this D/S to all 3 fronds -4, 3, 48, 3.96, #80771b there should be one going across, down and in the center
  • C/P E 26 R 58% X 2 Place atop fronds
  • C/P E 24 R 58% X 2 upper left of frame Apply Xero - clarity filter
  • C/P E18 R 58% X3 place to right of coconut - mirror duplicate move to left of coconut move above coconut layer
  • C/P E 25 R 58% then 82% place to left
  • C/P E 22 R 58% X 2 Free Rotate Right 110.50 all layers unchecked. Unsharp Mask. Place bottom right
  • C/P E16 Move to right
  • Image - Merge visible Center image on canvas R 95%
  • Resize canvas now to your preference. (I resized to 650 X 650)
  • New Layer FF white
  • New Layer Select all C/P Pp 08 into selection
  • Apply mask MD-MaskSet5-3 or one of your choice
  • Add your copyright and license info
  • Add Text I used bubble and soap Added penta filter dot and cross and D/S -1, 1, 100, .99, #a238a2
  • Save as PNG and you are done

©Alfadesire Tube: Goth Nurse

❥•.¸¸.•*´ Ct for Tiny Turtle Designs Artist ©Alfadesire`*•.¸¸.•❥

Artist: ©Alfadesire Tube: Goth Nurse

This awesome goth tube comes with
7 Color Layers, Syringe on separate layer and 2 Lip Colors
Tube is available here
I paired this tube with a kit designed by by Tiny Turtle Designs: Darkest Night
and a kit designed by Pink Paradox Productions: Zombie Nurse Which is available in her store

I used Darkest Night designed by by Tiny Turtle Designs: Darkest Night for this tag.

Scrap Kit Darkest Night is Available Here


I used Zombie Nurse designed by Pink Paradox Productions for this tag. This kit is available at her store


My Facebook Fan Page

Tiny Turtle Designs blog is Here

Wednesday, August 31, 2016

Ct TTDA ©Selisan Al-Gaib: Find Me

❥•.¸¸.•*´ Ct for Tiny Turtle Designs Artist ©Selsan Al-Gaib `*•.¸¸.•❥


Tube: Find Me ©Selsan Al-Gaib

This tube has 4 layers with different hair colors. This is a wonderful tube to work with - she is coy, sexy, and mysterious. Great tube for any type of tag
Tube is available here

I paired this tube with 2 kits by Tiny Turtle Designs: Violet Romance and Yesterdays Rose. Both of these are great kits and are available at her store as well as many more kits, as well as tubes by Selisan, to choose from.
Store here

The kits I used for these tags are available here:
Violet Romance
Yesterdays Rose
You can find my Facebook Fan Page here. If you like my work please stop by and like my page. Any comments, likes etc appreciated for my blog posts.
Thank you and Have a Great day!
Marie

Friday, August 26, 2016

Natalia NZ Plum

CT for TTDA ~~ © Natalia NZ - Plum


❥•.¸¸.•*´ Poser Fairy Dancer Tube available here `*•.¸¸.•❥

  • 1 PSD file
  • 2 poser tubes
  • character separate from background
  • wings on a separate layer
  • Size 3500 pix height

I paired these 2 fairies with 2 kits from Tiny Turtle Designs: Floral Nights and Fall Splendor.
Both of these kits are available at Tiny Turtle Designs.
Stop by the store for a huge selection of kits, CU items, tubes, and more.


Made with TTD Floral Night Kit
Floral Nights Kit Available here


Made with TTD Fall Splendor kit