CT PTU Tutorial for Digi Divas
|
| |
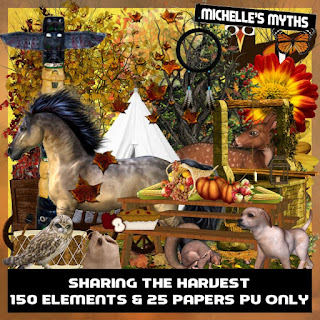
Great fall kit. This kit has 150 Elements and 25 papers. The fall, country, Native American and Thanksgiving themed elements. This large, stunning kit will give you hours of creative fun, and some awesome tags to share and show off. | |
C/P = Copy Paste / D/S = Drop Shadow default settings: 3 -3 58 7.92 bg: background, / S/F/D: Select All, Float, Defloat / E or el: Element R: Resize / Unsharp mask Settings: 3 30 3 (Use after resizing if the image looks grainy or blurry ) |
| Scrap Kit by Michelle's Myths: Sharing the Harvest. Available at Digi Divas Here. |
| Filters used: EC 5 Impact, Xero, and Carolaine and Sensibility Filters are Available here | GG setting for EC 5 Vaybs Tiny Double If you do not already have the settings it is Available here |
| Template by BKC Designs: Available here |
| Mask - MD-maskset8-2 Here |
- Open template Shift + D (Duplicate) Close original
- Canvas size 800 X 800 Center Placement chosen
- New layer drag to bottom
- Select all C/P pp 5 into selection Apply mask MD_MaskSet8-2 Merge Group
- New Layer - Select All C/P Pp 7 into selection. Apply same mask Change blend mode to overlay
- C/P E 79 move below template layer upper right - duplicate - mirror
- Raster 8 ( yellow rectangle) of template Select All Float Defloat C/P pp 20 R 75% X 2 Invert Clear - close or delete raster 8 - Apply EC 5 GG setting Vaybs tiny double (Setting Here) #F3C879 - FFFFFF - #ad6c3d Apply D/S
- Raster 7 (Layer under Yellow Rectangle) Manual Color correction tool - Source #6f5529 Target: #b37045 Apply same GG
- Merge these layers together
- On raster 3 (Brown oval layer) apply same manual correction as earlier Effects - Edge Effects - Enhance Apply same GG
- Raster 2 (Yellow oval layer) S/F/D C/P pp 16 as new layer - Invert - Clear
- C/P Tube (If using the same one I am R 75% Move face with oval On oval Layer S/F/D Invert on tube - clear
- Duplicate tube - Apply Xero Porecelain to original tube layer Change blend mode to overlay. On duplicated tube layer - Apply Guassian blur Change blend mode to soft Blend
- Merge Bottom tube layer down on oval layer, then merge duplicated tube layer down. Apply same GG as before. Merge Down
- Merge 2 small brown circles - Raster 4 and Copy raster 4 - on 1 layer Apply same GG
- Merge two yellow small circles - ( Raster 5 and copy raster 5 ) S/F/D
- C/P pp 10 as new layer - R 75% - Invert delete Apply same GG Merge down
- On word art - (Give )apply Coralaine and Sensibilty - dot, default setting. Apply GG then Unsharp mask
- On word Thanks - Apply Coralaine and sensibilty H-Line (default setting ) Apply GG Then Unsharp mask
- Apply Inner bevel to both words - setting Bevel 2, Width - 5, 20, 2, 50, 10, color: white Angle - 315, Intensity - 50 , Elevation - 20
- Apply EC 5 GG Subtle white setting changing glow radius to 5 and color to #22290f
We are now done with the original template - at this time either delete or close the original template images
Adding Elements from bottom up - mostly:
- C/P E 3 Place bottom center
- C/P E 83 R 75% X 2 Duplicate Place one behind and to left of large oval. Place the other one behind small circle on right side.
- C/P E 144 Move below rectangle of template.
- C/P E 51 R 40% move to right Duplicate R 75% Mirror place at center bottom of oval shape
- C/P E 6 place to lower center of oval shape move below 2 small circles of template.
Place following elements on layer above template but gor a few exceptions - but below the word art
- C/P E 89 R 75% Move to right atop small circle
- C/P tube (If using the same as I am) R 75% X 3 Mirror move to left
- C/P E 71 R 75% place center rt
- C/P E 40 R 50% Place between tube and horse
- C/P E 12 place to right
- C/P E 25 R 80% Move to bottom left
- C/P 49 R 40% place to lower left - duplicate X 3 mirror 1 and place this flower over yellow leaves. Move one to top of template move below lge oval layer - a little to the left. R the remaing flower another 75% move below and to right of mirrored flower.
- C/P E 84 R 75% X 2 Place to right
- C/P E 20 R 80% duplicate R 80% Free rotate left 24.96 duplicate, mirror. Place ears of corn at bottom of canvas
- C/P E 111 R 25% Duplicate R 75% duplicate - mirror place around bottom of canvas (See tag for reference, if needed)
- C/P E 69 R 50% place center bottom
- C/P E 23 R 68% place bottom left
- Finished except for resizing, then add your copyright and license information
- save as pspimage
- Add your name - I used Ballarea typeface sz 60 color: #22290f Caroline And Sensibilty H-lines subtle white GG color: #b18d24 Unsharp Mask D/S 1, -1, 98, 099.
- Export as PNG and you are finished


No comments:
Post a Comment