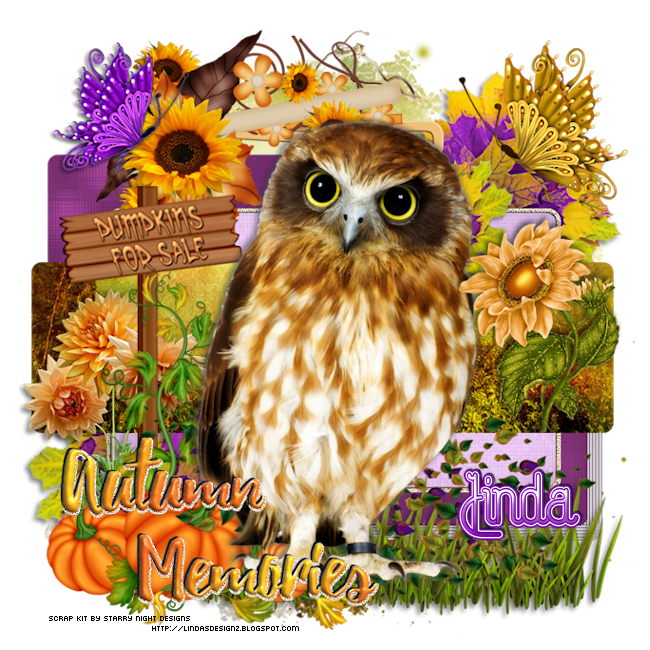
CT Tutorial for Digi Divas: Autumn Breeze
| Scrap designed by Starry night Designs: My Autumn Breeze. This is an absolutely awesome kit for autumn - all of the normal autumnal colors with purple thrown in . Contains 122 Elements/14 Papers PTU/PU Only
Scrap Kit is available here at Digi Divas
Starry Night Designs is one of the Spotlight Designers at Digi Divas this month and her kits are currently 50% off. So drop on by and check out all of her great kits, as well as everything else Digi Divas has to offer. |
Legend
C/P = Copy Paste / D/S = Drop Shadow default settings: 3 -3 58 7.92
bg: background, / S/F/D: Select All, Float, Defloat / E or el: Element
R: Resize / Unsharp mask Settings: 3 30 3 (Use after resizing if the image looks grainy or blurry )
I try to write my tutorials as plain and clear as possible, but if I get you confused (and, if I do, I am sorry) you can always refer back to the image we are making for reference. Also, this is just a guideline (I write where I place the elements ) but, feel free to move them around, or add different elements. Have fun and experiment, it is the best way to learn new things.
This tutorial was written by me on 09/07/2016 and is purely of my own making.
If there is any resemblance to any other tut it is purely coincidental. Please do not claim as your own. Please refer to my TOU on the left sidebar.
Needed Supplies / Filters
Template by Rachel's Designs Available Here
Mask by Rachel's Design: RR-MaskSet36-Mask1 Available Here
Xero Filter (porcelain, clarity and fritillary) Available Here
Filter: Funhouse ~ Streak Mirror Available Here
Scrap Kit My Autumn Breeze by Starry Night Designs Available Here at Digi Divas
Tube of choice - I used Mr Fennec by ©Laguna. Available at PFD (Pics for Design)
Fonts used: Cimochi and Capella
|

Okay, ready to start? Let's begin.
- Open template Shift + D Close original. Delete tag info (raster 1)
- Delete white background layer
- Resize canvas All Layers checked 800 X 800
- merge layers 3 and 4 Select all Float defloat C/P pp10 as new layer
- On paper layer invert , delete. Deselect.
- Apply funhouse filter streak mirror default setting (27, 27)
- Close off yellow rectangles (you can delete if you want, but I always close them so it is easier to go back and change something if I want or need to)
- Layer 6 (Lg green rectangle) Select All, Float, Defloat C/P pp5 as new layer. On paper layer - invert - delete. Deselect
- Apply Filter Xero - Frittilary default settings then Xero - Porcelain default settings except move blue slider to 0
- Apply D/S with these settings: 1, -1, 100, 0.99 reapply D/S changing to -1, 1
- Layer 5 Manual Color Correction source - FFFFFF target - #f8d6ae. Effects - Edge Effects - Enhance
- On layer 6 (light purple ) merge down
- Layer 9 (orange rectangle) S/F/D C/P pp 12 as new layer move paper up so that the bottom of image shows On paper layer invert delete deselect
- C/P E 113 Free Rotate right 90 all layers unchecked move to left above light purple paper layer
- C/P E 49 R 52% Place above leaf layer at raster 1. Sharpen - Unsharp mask>
- Apply Xero - Porcelain filter. Close or delete Raster 1
- Duplicate X 2 on first duplicated layer Free rotate left 68 all layers unchecked - place over raster 7 (yellow leaf) close or delete raster 7
- On 2nd duplicated layer Free rotate with same settings but change left to right. Duplicate Place above raster 8 layer delete or close raster 8
- On Duplicated image free rotate again same settings Place above raster 2 layer - delete/close raster 2
- If you have not already done so apply unsharp mask to above 4 layers
- C/P E 7 Drag below 1st leaf layer
- Working on top canvas layer below but below the word art
- C/P E 4 move above grass layer
- C/P E 111 R 62% place to left
- C/P e 59 place to left
- C/P E 81 R 68% X 2 place center right
- C/P E 93 place on center of canvas - Duplicate
- C/P tube as new layer (I used Mr. Fennec artist ©Laguna available at PFD) - You must own and have proper license to use this tube. R: 52% then 80%)
- (If you want to you can use E 93 (the owl) at full size in place of a tube)
- On top tube layer apply guassian blur 4 - Filter Xero - porcelain same settings.
- Apply xero - clarity default settings
- Change Blend mode to soft light - merge down
- C/P E 41 R 62% X 2 then 80% move to upper left
- C/P E 40 R 62% X 2 Mirror place to upper right
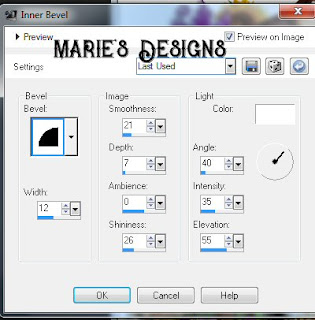
- On top word art layer apply effects - 3d -inner bevel with these settings: Bevel 2, W -12, Smoothness: 21, Depth: 7, Ambience: 0 Shiniess: 26, Color: White, Angle: 40, Intensity: 35, Elevation: 55

- On bottom part of word art Adjust - Manual Color Correction: Source: white Target: #f8d6ae. Add noise Guassian checked, Monochrome checked, Noise: 50. Then effects - edge effects: enhance
- Back on top layer of word art apply D/S -2, -3, 90, 0.99 Merge Down
- Place word art to bottom left over pumpkins
- Merge visible R 95%
- New layer drag to bottom of canvas Select All C/P pp 12 into selection
- Load Mask I used RR-MaskSet36-Mask1 Merge group
- Resize canvas to your preference
- Add copyright and license info
- Add name and save as PNG (save as psp first if you want to add other names later) then export png optimizer
Done !! Yeah. I hope you have enjoyed this tutorial and I thank you for trying it.


No comments:
Post a Comment